
OS X-Like Widgets with Screenlets on Ubuntu (3rd Update)
KDE 4, Windows, and Mac OS all have some sort of desktop widgets. Your Ubuntu desktop can also, using Screenlets. This post will guide you through installing and using Screenlets on Ubuntu 7.10 and 8.04.
[update] I’ve made some updates to this post on April 7 for version 0.1 of Screenlets.

Installing Screenlets
You can keep up-to-date with the latest version of Screenlets by installing it through the repository.
Open your sources.list file to add the repository:
sudo gedit /etc/apt/sources.list
Add this line to the end of the file (for Ubuntu 7.10):
deb http://ppa.launchpad.net/gilir/ubuntu gutsy main universe
Add this line to the end of the file (for Ubuntu 8.04):
deb http://ppa.launchpad.net/gilir/ubuntu hardy main universe
Save and close the text editor. Run this command to update apt:
sudo apt-get update
Install the Screenlets package:
sudo apt-get install screenlets
The package python-feedparser may also be required if it is not already installed:
sudo apt-get install python-feedparser
If starting the Screenlets Manager nags you that Gtkmozembed needs to be installed, some Screenlets may not work. Run this command to fix it:
sudo apt-get install python-gnome2-extras
Press y and enter to accept installing the package without verification.
Alternate install method
As of March 17, the Screenlets repository has not been updated to the latest
release (0.0.14). You can also install from the GetDeb.net
package, if you are using Ubuntu 7.10.
Simply download and double-click the package to install it.
Getting started with Screenlets
The Screenlets manager can be started from the System->Preferences->Screenlets
menu item. If it’s not there, you may find it in
Applications->Accessories->Screenlets.
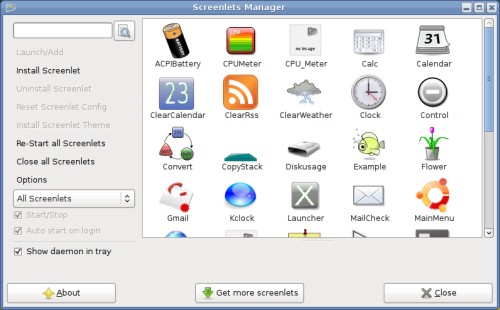
As you will see in the Screenlets Manager, the default installation includes a
lot of Screenlets. Start a Screenlet by selecting it in the list and clicking
the Launch/Add button. If you like the Screenlet, select the Auto start on
login box to have it launch automatically. Close a Screenlet by unselecting the
Start/Stop box.
Here’s a few of the Screenlets that I like:
- Gmail: a Gmail account checker.
- CPUMeter: simple CPU monitor with a few themes.
- ClearRSS: RSS feed reader.
- Sensors: monitors computer sensors with graph, it was able to watch my Nvidia GPU temperature.
Positioning and configuring Screenlets.
Click and drag to move a Screenlet around the screen. Right-click on a Screenlet
to open the configuration menu; from here you can change some settings common to
all Screenlets. The Window submenu contains a two useful options that you will
likely want to select:
Window->Sticky: sticks to all workspaces.Window->Lock: locks the position on the screen.
In the same right-click menu, click Properties to open the complete
configuration dialog, which also has Screenlet-specific options.
Mac OS X Dashboard style
Compiz’s Widget Layer plugin can be used with Screenlets to achieve an effect similar to the dashboard in Mac OS X. Your Screenlets will only be visible by activating a view that dims the desktop and displays the Screenlets on top of everything else.
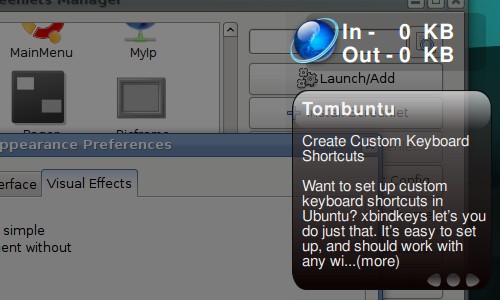
In the Appearance Preferences dialog (System->Preferences->Appearance), open
the Visual Effects tab and switch to the Custom effects level. If this
option is not available, you need to install CompizConfig Settings Manager
(CCSM) first:
sudo apt-get install compizconfig-settings-manager
Now, open CCSM by clicking the Preferences button. Find the Widget Layer
plugin and select the box to turn it on.
For all the Screenlets you want on the Widget Layer, open their right-click
menus and select Window->Widget. The Screenlet will disappear from your
desktop. Press the default Widget Layer key, F9, to dim the desktop and display
your widgets.
Get more Screenlets
The Get more Screenlets button in the Screenlets Manager opens Firefox to a
website that no longer exists. Here you can download new Screenlets.
Also, GNOME-Look.org has a Screenlets
category with a large
selection. Installation couldn’t be easier; drag and drop a downloaded Screenlet
tar.gz file into the Screenlets Manager window.
Google Gadgets and Web Widgets
I’ve written a separate post explaining how you can run Google Gadgets and Web Widgets on Your Desktop with Screenlets.
Enjoy your Screenlets!
Archived Comments
Whise
hello , im the author of screenlets , nice article , i just want to say i released a new version yesterday , with some new features , check it out
Tom
harshasv:
You can start Screenlets Manager from the terminal instead of the menu by
running the command screenlets-manager.
Whise:
Thanks Whise. I added instructions for installing the GetDeb package for 0.0.14.
Chris
harshasv: On my Ubuntu 7.10, Screenlets was installed in Applications —> Accessories, not in System
tim
hey thanks. I have been using screenlets for a while now and think they are great. this post was good because the screenlets website does not have a basic user guide (like i was not sure what sticky meant…)
ross
I get the following error:
You don’t have Feedparser installed!
Install python-feedparser or copy feedparser.py from rss/ folder to your
screenlets folder.
I tried
sudo apt-get install python-feedparser
but it couldn’t find the package. Also, I don’t know where to look for the feedparser.py file. Where is the rss/ folder?
Maybe you could update the site to reflect this error? Thanks.
Tom
ross:
You could always download Feedparser:
http://www.feedparser.org/feedparser.py
What did you do to get that error? I’ve never seen it.
sander
Here (7.10) Screenlets also installed itself at Applications > Accessories, and I also got the feedparser error. I got it through Synaptic (search for “feedparser”) and it got rid of the error. However, I get an error on each widget I activate. Not that it bothers - they all work fine. Sweet stuff.
Creig
I’m using 7.10, and I, too, got the feedparser error. Specifically:
You don’t have Feedparser installed!
Install python-feedparser or copy feedparser.py from rss/ folder to your
screenlets folder.
So I was able to download the Feedparser.py file, but A) can’t seem to properly install it and B) have copied it to the /usr/share/applications folder, but I’m still getting the same error. I’d be stoked to get some instruction.
duncan
I’m using 7.10, i was getting the same message so i installed feedparser.py to /usr/share/screenlets-manager and it started fine.
Anonymous
Screenlets 0.1 has been released,It’s now available on getdeb
http://www.getdeb.net/app/Screenlets
Vadim P.
Do you think you can update instructions for using other gadgets (ie google gadgets and so on) in screenlets?
Thanks!
Jace
Thanks so much, I just installed ubuntu and have been wondering why the screen went dim when I pressed the F9 key :) Now I have some nice screenlets running in the widget layer.
Danilo Caio
I’ve used to use this place as guide for news and tips about Ubuntu cause of the informations here shared are very precise and useful. I appreciate your work in this blog. The present article is great and help me out to install and set screenlets up. Thank you.
Danilo.
bruno
Hi. This is a great article, but, in my Ubuntu 8.0.4 (Linux bruno-notebook 2.6.24-16-generic #1 SMP Thu Apr 10 12:47:45 UTC 2008 x86_64 GNU/Linux), this application does not work.
The problem is:
When I start the screenlets-manager by the terminal, or by the shortcut on:
Applications->Accessories->Screenlets, the screenlets-manager open fine, BUT,
when I click under a screenlet (eg. DiskUsage) and click on Launch/Add, nothing
happens.
The ps command show this:
bruno 7593 0.0 1.0 240396 21440 ? S 12:33 0:00 python
/usr/share/screenlets-manager/screenlets-daemon.py
bruno 7610 1.9 2.8 412296 56036 ? S 12:34 0:05 python -u
/usr/share/screenlets-manager/screenlets-manager.py
bruno 7658 0.0 0.0 5176 848 pts/0 R+ 12:39 0:00 grep screenlets
Anyone can help me?
Abu
Does it work in kubuntu 8.04??
Jacques
Hello,
How can I configure widget layer in Ubuntu 8.04 Hardy Heron? I install Compiz Manager but it is disable, how can I active the configuration?
Thanks
ykhan45
Thankks i have managed to install screenlets on Ubuntu 8.
Ranger
Where is the main screenlets configuration file actually located? I think I need to edit out some redundant entries.
I have “docked” a half-dozen screenlets within the “Sidebar” screenlet - however, when I log in (or restart Ubuntu 8.04) all I initially see is the empty Sidebar with no screenlets docked in it - and none running on the desktop either. Only the bare Sidebar itself initializes.
By right-clicking on the “Screenlets daemon” icon in the taskbar notification area, and choosing “Restart All Screenlets”, most of the docked screenlets will then appear - but seldom ALL of them that SHOULD be there - usually one or two (seemingly at random) will still be absent from the Sidebar.
Also, after using the “Restart All Screenlets” menu command I always have multiple copies of ALL the sidebar-docked screenlets which appear (all piled on top of each other) in the upper left-hand corner of my desktop. I select each and choose “Delete this screenlet”, but they all just reappear again at the next login/restart.
I must have multiple entries somewhere in the config file, or some other such mess. Apparently my system doesn’t remember any “Delete this Screenlet” command between logins or reboots - I have to manually delete all of those un-docked ‘extra copies’ each time I login/restart.
I have tried uninstalling the whole lot and then reinstalling them again, but to no avail.
Any help would be greatly appreciated!
Tom
Ranger:
You can find the Screenlets configuration files in:
~/.screenlets
~/.config/Screenlets
Also, individual Screenlets are autostarted from files in this folder:
~/.config/autostart
It looks like Screenlets fails to remove it’s configuration properly when it’s uninstalled.
Ranger
Thanks Tom! That info was much appreciated! Cheers!
gambetty
Hello
Successful install following these instructions on Ubuntu 8.04. However, in System—>Preferences—>Appear, viz effects tab, I only have three choices, none of which are ‘custom’…I only get three radio buttons, with no effects, some effects, and ‘lots’ of effects.
I just skipped that part
Tom
gambetty:
If this option is not available, you need to install CompizConfig Settings
Manager (CCSM) first:
sudo apt-get install compizconfig-settings-manager
Anonymous
Thanks for the great article.
I was wondering if it’s possible to do something with the compiz widgets. Basically I’d like all my screenlets to be set to “below” and be visible at all times so when I don’t have windows in the way I can see them. Easy Enough.
However I’d like to combine this with the compiz widgets function so that when I want to see them without having to minimize windows I can hit F9, the screen dims and all the screenlets are brought to the front. Is this possible?
rishav
Here is one screenshoot of your mentioned things
http://techspalace.blogspot.com/2008/04/screenlets-mac-or-vista-widget-for.html
C.Loewe
Good one!
Still, I didn’t worked for me… it just happened that I clicked F9 and I only
widget that appeared was the wallpaper…
To solve this and after a while, i also installed google widgets and was is missing on this great tutorial, at least for me is adding wich widget window you are going to use…
For screenlets, in System-> Preference-> Advanced Desktop Effects Setings ->
Widgets Layer
Then Add on Behaviour
For Screenlets, instead of class=, use
name=Screenlet.py
For Google one, use
class=Ggl-gtk
To enable both, I simply left screenlets with F9 and google ones with F10 and added
(class=Ggl-gtk) & name=Screenlet.py
Hope it helps…
Sajid Iqbal
Thanks for such a nice tutorial. I am installing it now.
Anonymous
its not good practice to use ‘sudo’ for graphical applications, use ‘gksu’ instead
shazam
For some reason when i enter the first line in the directions for the repository, the command isn’t recognized. Halp?
harshasv
The screenlets have successfully installed, but their entry is not updated in the System->Preferences menu. Any workaround for this will be a lot of help. Thanks - Harsha