
Record Your Screen With XVidCap
If you want to record your screen in Linux, XVidCap is the best solution. It’s easy to install, able to capture fast without dropping frames, and offers lots of options.
XVidCap is really fast when capturing from the screen. I was able to capture Compiz Fusion effects at 15 frames per second, with no dropped frames or slow down. Other tools would drop frames when trying to do this. I took a video of Compiz Fusion, captured with XVidCap, to demonstrate just how well it works:
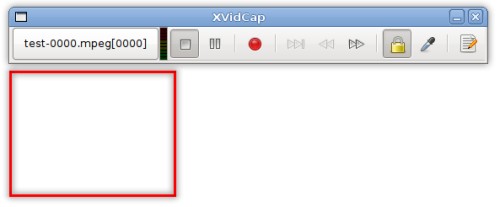
XVidCap displays a red box for choosing the area to be recorded. The box can be moved by resizing it with the mouse, or using the dropper button on the toolbar to select the area. Toggle the lock button to lock and unlock the toolbar from the top of the red box. The stop, pause, and recored buttons let you control the recording. After a recording is completed you will be shown details of the video that was saved.
Right click on the filename button to bring up the menu. From here you can enter the preferences window. The first thing you will want to do is rescale the output with the slider in the general tab so the video is not too large. The multi-frame tab lets you choose the file format, codec, FPS, and quality. The default DIVX codec will work when uploading to YouTube. XVidCap does have an audio record feature which I was not able to get working.
XVidCap can be installed with the DEB package provided by the developers. You can download the package for version 1.1.6 from the project’s SourceForge download page.
Archived Comments
ausberg
What is difference between this program and Istanbul (http://live.gnome.org/Istanbul)?
Tom
ausberg,
Istanbul does the same thing as XVidCap, but XVidCap has less overhead when
recording and saves to a more common video format.
Anonymous
It’s a crappy software. I could not get it to record on Ubuntu 8.04. I even lowered the frame rate to 10 fps and the quality to 10. I click record and do some shit, then i click stop. When the little window pops up and i click on play, nothing happens. The crappy test-000.mpeg file just sits there with a 0 byte size and doesn’t play. Use some other software. This is crap.
Anonymous
it just freezes on me..
VBAssassin
When ever i click record… it just closes the program :-S
glennji
This works a treat on Ubuntu 9.04 (Jaunty) with Compiz and the Nvidia binary drivers! (Felt I had to leave a positive comment to balance out the last three.)
Seriously, it installs from a repo and works exactly as described. I can capture all the Compiz/Fusion animations at a full-screen 1680x1050 resolution…
Maybe it’s improved recently?
jif
how do the hell do you save!!!!!!!!!!!!!!?????????????????
me
overload cpu :( intel i7 ati mobility radeon hd 5650
1wang
works well on an old 1.6 GHz Notebook,but captures only 20-60 % of the frames; records sound but the sound is not usable. So basically installs and works well on ubuntu 10.0.4 but needs more CPU power.
kool
Thanks a lot! You saved me for my final presentation!
Felix
Using ubuntu 10.04, good results so far.
Thanks for the post.
Alanur
For the common no-audio or no-sound problem:
1. Uninstall xvidcap in Synaptic
2. Install xvidcap from http://sourceforge.net/projects/xvidcap/files/xvidcap/1.1.7/xvidcap_1.1.7jaunty_i386.deb/download
3. Lock the installed version in Synaptic
4. Install pavucontrol in Synaptic (Needed in Ubuntu 10.04 but not in Linux
Mint 10: already present)
5. Open the program with padsp xvidcap
6. Click on the recording button (red circle)
7. Run pavucontrol, go to the Recording tab and there choose Monitor of Analog
Stereo Internal Audio
Done!!
To record with sound, the program has always to be run with padsp xvidcap (for example from ALT+F2). To run it always like that from the menu: run alacarte, go to Sound and video, then to XVidCap Screen Capture, Properties and where it says Command put padsp xvidcap.
The stated is to record the system sound, that is, the one coming out of the speakers, that can be of a song or movie of our hard drive or pendrive played by Totem, of a Flash music video of a website played by Firefox, …
Nevertheless, sometimes it can be necessary to record the microphone sound, for example if we want to make a videotutorial to explain how a program works. In this case we put xvidcap in recording state, run pavucontrol and in the Recording tab we put Analog Stereo Internal Audio (without “Monitor of” ahead).
If we only want to record sound (without video) we can run from ALT+F2 gnome-sound-recorder. The first time probably it will be configured to record from the microphone. To record the system sound we run with ALT+F2 gnome-volume-control, go to the Hardware tab and in Profile we put Analog Stereo Output (it’s also possible to do this running pavucontrol and using the Configuration tab).
But when we finish we have to put again Analog Stereo Duplex in the Profile of Hardware of gnome-volume-control (or of Configuration of pavucontrol), so we can still choose the origin of the sound when recording with xvidcap.
Another option, not to have to change once and again between Analog Stereo Duplex and Analog Stereo Output neither limit the sound source for xvidcap, is to leave Analog Stereo Duplex and use also pavucontrol when we want to change the source of the sound for gnome-sound-recorder. Like the stated for padsp xvidcap, to change where we want to record the sound from, we put gnome-sound-recorder recording, open pavucontrol and in the Recording tab we put the desired option. In this case there is no need to use padsp (xvidcap needs it because it was designed for OSS. What padsp does is to connect OSS with PulseAudio, as shown in http://linux.die.net/man/1/padsp ).
NB: sometimes, to change from Analog Stereo Duplex to Analog Stereo Output it may be necessary to change first to Off, close, open again and then change finally to Analog Stereo Output. The same for the opposite change. If not, the computer may “not notice” that we have applied the change.
&&&&&&&&&&&&&&&&&&&&&&&&&&&&&&&&&&&&&&&&&&
In order to install xvidcap in a x86_64 system I just have to use the –force-architecture option to the dpkg -i command.
angelv@vaso:~/Desktop$ sudo dpkg –force-architecture -i xvidcap_1.1.7jaunty_i386.deb
But when trying to run it I see that there are some i386 libraries missing. In order to easily install them I use the getlibs script.
angelv@vaso:~/Desktop$ padsp xvidcap
xvidcap: error while loading shared libraries: libtheora.so.0: cannot open
shared object file: No such file or directory
angelv@vaso:~/Desktop$ getlibs /usr/bin/xvidcap
%%%%%%%%%%%%%
About getlibs: http://ubuntuforums.org/showthread.php?t=474790
kevLinK
It works flawless for me, I am using openSUSE 11.4
Noaeis
In Linux Mint MATE there is no default sound recorder, but you can install Audio Recorder to record audio from the microphone or from the system: https://launchpad.net/~osmoma/+archive/audio-recorder
Me
Wow great program!