
Introduction to the xmonad Tiling Window Manager
What good is having a large display if you’re constantly rearranging windows to fit them on the screen? I got tired of try to fit a web browser with other smaller windows and decided to try xmonad, a tiling window manager that could do this for me.
A tiling window manager arranges your windows in a grid. This maximizes window sizes and prevents any window from obscuring another.

Installing xmonad
xmonad is available from the Ubuntu repositories. Install xmonad from the package xmonad (click the link to install), or by running the command below in your terminal:
sudo apt-get install xmonad
A number of dependencies will be installed with xmonad. They are needed because reconfiguring xmonad requires recompiling it. (Don’t worry, this is handled automatically.)
I’d also highly recommend installing dmenu, a simple application launcher that integrates with xmonad. Install dmenu from the package dwm-tools (click the link to install), or by running the command below in your terminal:
sudo apt-get install dwm-tools
From the login screen, you should now be able to select an xmonad session and log in to start xmonad.
The basics of using xmonad
Note: All the keyboard commands you’ll use with xmonad begin with what’s called the mod key. The default mod key is the left alt key.
If no windows are open xmonad will just display a blank screen. Open a new terminal window with mod+shift+return. With only one window open, xmonad will let it use the entire screen.
Instead of running more applications using the terminal, let’s use the dmenu launcher. If you have dmenu installed, pressing mod+p with open it on the top of the screen. Start typing to find an application, use the right and left arrows to select a result, and press return to run the selected application. Press escape to close dmenu if you decide not to run anything.
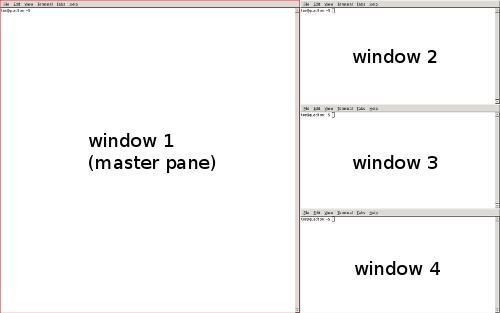
Open some applications so you have more windows to experiment with. Notice how xmonad splits the screen down the center. On the left side is the master pane by itself. On the right side all the other windows are displayed stacked on top of each other.
Press mod+space to cycle though different tiling algorithms. By default there are three: tall (vertical split with master pane on left), mirror tall (horizontal split with master pane on top), and full (one window displayed full screen).
The currently focused window is displayed with red borders. You may have already noticed that you can focus a window by moving the mouse over it. On the keyboard, switch focus using mod+j (focus next window) and mod+k (focus previous window).
Perform the equivalent of clicking a conventional window manager’s close box for a window by pressing mod+shift+c.
What if you want to move a window into the master pane? The simplest way to do this is mod+return, which swaps the currently focused window into the master pane. For finer control of where windows are displayed use mod+shift+j (move the focused window up) and mod+shift+k (move the focused window down).
If the master pane is not the right width (tall mode) or height (mirror tall mode), you can resize it using mod+h (smaller) and mod+l (larger).
Like most window managers, xmonad offers multiple workspaces. By default you get nine workspaces, each corresponding to a number key. Pressing mod+[num], where [num] is from 1 to 9, will switch you to that workspace. Use mod+shift+[num] to move the focused window to the specified workspace.
You may have noticed that some applications and dialog windows are not tiled normally. These are floating windows, which you can move and resize like windows in a conventional window manager. To float any window yourself, hold down the mod key and drag the window with the left mouse button. Once a window is floated you can move it around the screen in the same manner. Use the mod key and right mouse button to resize a floated window. Tile a window normally again by focusing it and pressing mod+t.
With these basics, you should be able to start using xmonad.
Reconfiguring xmonad
xmonad is configured using a Haskell source file (~/.xmonad/xmonad.hs); you
will need to create this file for your user:
mkdir ~/.xmonad
touch ~/.xmonad/xmonad.hs
The easiest way to get started customizing xmonad is using a template
configuration file containing all the default settings and comments explaining
what they do. Such a template is available on the xmonad
wiki.
Paste it into your ~/.xmonad/xmonad.hs file. You’ll probably want to change
the myTerminal setting back to gnome-terminal (or your own preferred terminal)
instead of xterm.
The mod+q key combo will reconfigure xmonad with your settings, and restart it. This process happens very fast and nearly seamlessly, you might miss it! If there’s an error in the configuration file, xmonad will fall back to the previous settings and display an error dialog.
Read though the template configuration file and have fun customizing it to your tastes!
These are only the basics, you can do much more with xmonad than what I’ve covered. The xmonad documentation is a good resource if you want to learn more.
Archived Comments
Jussi
This is a very nice tutorial. However, I think that tiling window managers may be slightly too hardcore for you average noob. And at least for me these not-so-mainstream window managaers are fun to try, but i’ve never grown too much into them. And during years I have tried most of them.
There is a reason both Windows and Mac OS and as well as Gnome/KDE/XFce use the screen real estate the way they do and are also popular. I’ll leave it as an excercise for the reader to wonder why :)
kounryusui
( Off topic, but I think it would not be a stupid idea to make the links to apt:
different from the http links. Some small gif besides it or something. )
And thanks for the introduction to the xmonad, will test it as soon as I have a
new install of Ubuntu on some spare partition :)
Dewey
nice tutorial. i started out in the tiling wm world with wmii, which i used for over a year. due to instabilities and frequent config format changes in wmii, i recently switched to xmonad and love it. i run this now on ubuntu, freebsd and openbsd, with displays ranging from dual 19” monitors to a 7” widescreen laptop lcd. i have no intention of ever going back to any of the other cluttered non-tiling window managers.
Wikit
Great tutorial!
But please go with dzen2 instead of dmenu :)
I’d love to know some dzen2 101 info that doesn’t go over my head.
Jedai
Yeah, XMonad is really nice. Especially the total freedom of configuration, the numerous layouts, the easy keyboard shortcuts…
I really think that tiling WM are the way to go, floating every windows just
wastes so much time in reorganization and resizing. As to why this is still the
predominant paradigm I would venture that “tradition” has much to do with it
(going back to the first WMs by Xerox) and also the fact that most tiling WMs
target a keyboard-using audience which is traditionally limited to advanced
computer users.
Getting to know a tiling WM is slightly more demanding than KDE, Metacity or
Windows (though those now sports some shortcuts that beginners never know exist)
but it’s much more rewarding in the end and XMonad’s stability and reactivity
makes it one of the best choice in this field nowadays.
My first contact with XMonad came after I grew tired with some bugs in Metacity (Gnome’s WM) and I might say that I won’t ever be coming back to Metacity since I can’t see anything in it that XMonad don’t do better already.
Fujiko Fujio
What I’m really looking for is a way for gnome to remember the position and sizes of my windows. I know compiz has something like this, but I think I have to define a configuration for each window. I settled with centering all my windows for now, instead of having it randomly popup somewhere.
XP could do this easily and I think so does apple, why can everyone do this and we can’t on ubuntu?
Repabil
Hey. Checkout http://burtonini.com/blog/computers/devilspie
Marius Scurtescu
On 8.10 amd64, dmenu is a virtual package. Clicking the apt link for it gives an error.
Using the command line will try to install dwm and dwm-tools, is that expected?
Tom
Thanks Marius, I didn’t test the apt link to find out that it doesn’t work with virtual packages. I’ve changed the post to the real package, dwm-tools.
Dan Shumaker
Fantastic!!! Xmonad is great! Thank you so much for doing this.
Jon
I really wish you wrote this a month or two ago when I was just getting started with xmonad - it’s the best xmonad 101 tutorial I’ve read!